Add an AI agent to an Existing Project
Now that you've learned the basics of creating an AI agent with Dagger in Build an AI agent, its time to apply those lessons to a more realistic use case. In this guide, you will build an AI agent that builds features for an existing project.
For this guide you will start with a Daggerized project. The agent will use the Dagger functions in this project that are already used locally and in CI for testing the project.
Requirements
This quickstart will take you approximately 10 minutes to complete. You should ideally have completed the AI agent and CI quickstarts and should be familiar with programming in Go, Python, TypeScript, PHP, or Java.
Before beginning, ensure that:
- you have installed the Dagger CLI.
- you have a container runtime installed on your system and running. This can be Docker, Podman, nerdctl, Apple Container, or other Docker-like systems.
- you have configured an LLM provider to use with Dagger.
- you have a GitHub account
- you have completed the AI agent quickstart to learn the basics of LLMs in Dagger.
- you have completed the CI quickstart to a Daggerize a project.
Inspect the example application
This quickstart uses the Daggerized project from the CI quickstart. To verify that your project is in the correct state, change to the project's working directory and list the available Dagger Functions:
cd hello-dagger
dagger functions
This should show:
Name        Description
build       Build the application container
build-env   Build a ready-to-use development environment
publish     Publish the application container after building and testing it on-the-fly
test        Return the result of running unit tests
Create a workspace for the agent
The goal of this quickstart is to create an agent to interact with the existing codebase and add features to it. This means that the agent needs the ability to list, read and write files in the project directory.
To give the agent these tools, create a Dagger submodule called workspace. This module will have Dagger Functions to list, read, and write files. The agent can use these Dagger Functions to interact with the codebase. By giving the agent a module with a limited set of tools, the agent has less room for error and will be more successful at its tasks.
- Go
- Python
- Typescript
- PHP
- Java
Start by creating the submodule:
dagger init --sdk=go .dagger/workspace
Replace the .dagger/workspace/main.go file with the following contents:
// A module for editing code

package main

import (
	"context"
	"dagger/workspace/internal/dagger"
)

type Workspace struct {
	Source *dagger.Directory
}

func New(
	// The source directory
	source *dagger.Directory,
) *Workspace {
	return &Workspace{Source: source}
}

// Read a file in the Workspace
func (w *Workspace) ReadFile(
	ctx context.Context,
	// The path to the file in the workspace
	path string,
) (string, error) {
	return w.Source.File(path).Contents(ctx)
}

// Write a file to the Workspace
func (w *Workspace) WriteFile(
	// The path to the file in the workspace
	path string,
	// The new contents of the file
	contents string,
) *Workspace {
	w.Source = w.Source.WithNewFile(path, contents)
	return w
}

// List all of the files in the Workspace
func (w *Workspace) ListFiles(ctx context.Context) (string, error) {
	return dag.Container().
		From("alpine:3").
		WithDirectory("/src", w.Source).
		WithWorkdir("/src").
		WithExec([]string{"tree", "./src"}).
		Stdout(ctx)
}

// Return the result of running unit tests
func (w *Workspace) Test(ctx context.Context) (string, error) {
	nodeCache := dag.CacheVolume("node")
	return dag.Container().
		From("node:21-slim").
		WithDirectory("/src", w.Source).
		WithMountedCache("/root/.npm", nodeCache).
		WithWorkdir("/src").
		WithExec([]string{"npm", "install"}).
		WithExec([]string{"npm", "run", "test:unit", "run"}).
		Stdout(ctx)
}
Start by creating the submodule:
dagger init --sdk=python .dagger/workspace
Replace the .dagger/workspace/src/workspace/main.py file with the following contents:
from typing import Annotated

import dagger
from dagger import Doc, dag, field, function, object_type


@object_type
class Workspace:
    """A module for editing code"""

    source: Annotated[dagger.Directory, Doc("the workspace source code")] = field()

    @function
    async def read_file(
        self,
        path: Annotated[str, Doc("The path to the file in the workspace")],
    ) -> str:
        """Read a file in the Workspace"""
        return await self.source.file(path).contents()

    @function
    def write_file(
        self,
        path: Annotated[str, Doc("The path to the file in the workspace")],
        contents: Annotated[str, Doc("The new contents of the file")],
    ) -> "Workspace":
        """Write a file to the Workspace"""
        self.source = self.source.with_new_file(path, contents)
        return self

    @function
    async def list_files(self) -> str:
        """List all of the files in the Workspace"""
        return await (
            dag.container()
            .from_("alpine:3")
            .with_directory("/src", self.source)
            .with_workdir("/src")
            .with_exec(["tree", "./src"])
            .stdout()
        )

    @function
    async def test(self) -> str:
        """Return the result of running unit tests"""
        node_cache = dag.cache_volume("node")
        return await (
            dag.container()
            .from_("node:21-slim")
            .with_directory("/src", self.source)
            .with_mounted_cache("/root/.npm", node_cache)
            .with_workdir("/src")
            .with_exec(["npm", "install"])
            .with_exec(["npm", "run", "test:unit", "run"])
            .stdout()
        )
Start by creating the submodule:
dagger init --sdk=typescript .dagger/workspace
Replace the .dagger/workspace/src/index.ts file with the following contents:
import { dag, object, func, Directory } from "@dagger.io/dagger"

@object()
export class Workspace {
  /**
   * the workspace source code
   */
  @func()
  source: Directory

  constructor(source: Directory) {
    this.source = source
  }

  /**
   * Read a file in the Workspace
   *
   * @param path The path to the file in the workspace
   */
  @func()
  async readFile(path: string): Promise<string> {
    return await this.source.file(path).contents()
  }

  /**
   * Write a file to the Workspace
   *
   * @param path The path to the file in the workspace
   * @param contents The new contents of the file
   */
  @func()
  writeFile(path: string, contents: string): Workspace {
    this.source = this.source.withNewFile(path, contents)
    return this
  }

  /**
   * List all of the files in the Workspace
   */
  @func()
  async listFiles(): Promise<string> {
    return await dag
      .container()
      .from("alpine:3")
      .withDirectory("/src", this.source)
      .withWorkdir("/src")
      .withExec(["tree", "./src"])
      .stdout()
  }

  /**
   * Return the result of running unit tests
   */
  @func()
  async test(): Promise<string> {
    const nodeCache = dag.cacheVolume("node")
    return dag
      .container()
      .from("node:21-slim")
      .withDirectory("/src", this.source)
      .withMountedCache("/root/.npm", nodeCache)
      .withWorkdir("/src")
      .withExec(["npm", "install"])
      .withExec(["npm", "run", "test:unit", "run"])
      .stdout()
  }
}
Start by creating the submodule:
dagger init --sdk=php .dagger/workspace
Replace the .dagger/workspace/src/Workspace.php file with the following contents:
<?php

declare(strict_types=1);

namespace DaggerModule;

use Dagger\Attribute\{DaggerObject, DaggerFunction, Doc};
use Dagger\Directory;
use function Dagger\dag;

#[DaggerObject]
#[Doc('A module for editing code')]
class Workspace
{
  #[Doc('The source directory')]
  public Directory $source;

  #[DaggerFunction]
  public function __construct(Directory $source)
  {
    $this->source = $source;
  }

  #[DaggerFunction]
  #[Doc('Read a file in the Workspace')]
  public function readFile(#[Doc('The path to the file in the workspace')] string $path): string
  {
    return $this->source->file($path)->contents();
  }

  #[DaggerFunction]
  #[Doc('Write a file to the Workspace')]
  public function writeFile(
    #[Doc('The path to the file in the workspace')] string $path,
    #[Doc('The new contents of the file')] string $contents
  ): Workspace {
    $this->source = $this->source->withNewFile($path, $contents);
    return $this;
  }

  #[DaggerFunction]
  #[Doc('List all of the files in the Workspace')]
  public function listFiles(): string
  {
    return dag()
      ->container()
      ->from('alpine:3')
      ->withDirectory('/src', $this->source)
      ->withWorkdir('/src')
      ->withExec(['tree', './src'])
      ->stdout();
  }

  #[DaggerFunction]
  #[Doc('Get the source code directory from the Workspace')]
  public function getSource(): Directory
  {
    return $this->source;
  }

  #[DaggerFunction]
  #[Doc('Return the result of running unit tests')]
  public function test(): string
  {
    $nodeCache = dag()->cacheVolume('node');
    return dag()
      ->container()
      ->from('node:21-slim')
      ->withDirectory('/src', $this->source)
      ->withMountedCache('/root/.npm', $nodeCache)
      ->withWorkdir('/src')
      ->withExec(['npm', 'install'])
      ->withExec(['npm', 'run', 'test:unit', 'run'])
      ->stdout();
  }
}
Start by creating the submodule:
dagger init --sdk=java .dagger/workspace
Replace the .dagger/workspace/src/main/java/io/dagger/modules/workspace/Workspace.java file with the following contents:
package io.dagger.modules.workspace;

import static io.dagger.client.Dagger.dag;

import io.dagger.client.Container;
import io.dagger.client.exception.DaggerQueryException;
import io.dagger.client.Directory;
import io.dagger.client.CacheVolume;
import io.dagger.client.File;
import io.dagger.module.annotation.Function;
import io.dagger.module.annotation.Object;
import java.util.List;
import java.util.concurrent.ExecutionException;

@Object
public class Workspace {
  /** the workspace source code */
  public Directory source;

  // Add a public no-argument constructor as required by the Java SDK
  public Workspace() {}

  public Workspace(Directory source) {
    this.source = source;
  }

  /**
   * Read a file in the Workspace
   *
   * @param path The path to the file in the workspace
   */
  @Function
  public String readFile(String path)
      throws ExecutionException, DaggerQueryException, InterruptedException {
    return source.file(path).contents();
  }

  /**
   * Write a file to the Workspace
   *
   * @param path The path to the file in the workspace
   * @param contents The new contents of the file
   */
  @Function
  public Workspace writeFile(String path, String contents) {
    this.source = source.withNewFile(path, contents);
    return this;
  }

  /**
   * List all of the files in the Workspace
   */
  @Function
  public String listFiles() throws ExecutionException, DaggerQueryException, InterruptedException {
    return dag()
      .container()
      .from("alpine:3")
      .withDirectory("/src", source)
      .withWorkdir("/src")
      .withExec(List.of("tree", "/src"))
      .stdout();
  }

  /** Return the result of running unit tests */
  @Function
  public String test()
      throws InterruptedException, ExecutionException, DaggerQueryException {
    CacheVolume nodeCache = dag().cacheVolume("node");
    return dag().container()
        .from("node:21-slim")
        .withDirectory("/src", source)
        .withMountedCache("/root/.npm", nodeCache)
        .withWorkdir("/src")
        .withExec(List.of("npm", "install"))
        .withExec(List.of("npm", "run", "test:unit", "run"))
        .stdout();
  }

}
In this Dagger module, each Dagger Function performs a different operation:
- The
read-fileDagger Function reads a file in the workspace. - The
write-fileDagger Function writes a file to the workspace. - The
list-filesDagger Function lists all the files in the workspace. - The
testDagger Function runs the tests on the files in the workspace.
See the functions of the new workspace module:
dagger -m .dagger/workspace functions
This should list the following functions:
Name         Description
list-files   List all of the files in the Workspace
read-file    Read a file in the Workspace
source       the workspace source code
test         Return the result of running unit tests
write-file   Write a file to the Workspace
Now install the new submodule as a dependency to the main module:
dagger install ./.dagger/workspace
Create an agentic function
This agent will make changes to the application and use the existing test function from the Daggerized CI pipeline to validate the changes.
- Go
- Python
- Typescript
- PHP
- Java
Add the following new function to the main Dagger module in .dagger/main.go:
// A coding agent for developing new features
func (m *HelloDagger) Develop(
        ctx context.Context,
        // Assignment to complete
        assignment string,
        // +defaultPath="/"
        source *dagger.Directory,
) (*dagger.Directory, error) {
        // Environment with agent inputs and outputs
        environment := dag.Env().
                WithStringInput("assignment", assignment, "the assignment to complete").
                WithWorkspaceInput(
                        "workspace",
                        dag.Workspace(source),
                        "the workspace with tools to edit and test code").
                WithWorkspaceOutput(
                        "completed",
                        "the workspace with the completed assignment")

        // Detailed prompt stored in markdown file
        promptFile := dag.CurrentModule().Source().File("develop_prompt.md")

        // Put it all together to form the agent
        work := dag.LLM().
                WithEnv(environment).
                WithPromptFile(promptFile)

        // Get the output from the agent
        completed := work.
                Env().
                Output("completed").
                AsWorkspace()
        completedDirectory := completed.Source().WithoutDirectory("node_modules")

        // Make sure the tests really pass
        _, err := m.Test(ctx, completedDirectory)
        if err != nil {
                return nil, err
        }

        // Return the Directory with the assignment completed
        return completedDirectory, nil
}
Add the following new function to the main Dagger module in .dagger/src/hello_dagger/main.py:
@function
async def develop(
    self,
    assignment: Annotated[str, Doc("Assignment to complete")],
    source: Annotated[dagger.Directory, DefaultPath("/")],
) -> dagger.Directory:
    """A coding agent for developing new features."""
    # Environment with agent inputs and outputs
    environment = (
        dag.env()
        .with_string_input(
            "assignment", assignment, "the assignment to complete"
        )
        .with_workspace_input(
            "workspace",
            dag.workspace(source),
            "the workspace with tools to edit and test code",
        )
        .with_workspace_output(
            "completed", "the workspace with the completed assignment"
        )
    )

    # Detailed prompt stored in markdown file
    prompt_file = dag.current_module().source().file("develop_prompt.md")

    # Put it all together to form the agent
    work = dag.llm().with_env(environment).with_prompt_file(prompt_file)

    # Get the output from the agent
    completed = work.env().output("completed").as_workspace()
    completed_directory = completed.source().without_directory("node_modules")

    # Make sure the tests really pass
    await self.test(completed_directory)

    # Return the Directory with the assignment completed
    return completed_directory
Add the following new function to the main Dagger module in .dagger/src/index.ts:
/**
* A coding agent for developing new features
*
* @params assignment Assignment to complete
* @params source Optional Directory to develop on
*/
@func()
async develop(
    assignment: string,
    @argument({ defaultPath: '/' }) source: Directory
): Promise<Directory> {
    // Environment with agent inputs and outputs
    const environment = dag
        .env()
        .withStringInput('assignment', assignment, 'the assignment to complete')
        .withWorkspaceInput(
        'workspace',
        dag.workspace(source),
        'the workspace with tools to edit and test code'
        )
        .withWorkspaceOutput('completed', 'the workspace with the completed assignment')

    // Detailed prompt stored in markdown file
    const promptFile = dag.currentModule().source().file('develop_prompt.md')

    // Put it all together to form the agent
    const work = dag.llm().withEnv(environment).withPromptFile(promptFile)

    // Get the output from the agent
    const completed = work.env().output('completed').asWorkspace()
    const completedDirectory = completed.source().withoutDirectory('node_modules')

    // Make sure the tests really pass
    await this.test(completedDirectory)

    // Return the Directory with the assignment completed
    return completedDirectory
}
Add the following new function to the main Dagger module in .dagger/src/HelloDagger.php:
  #[DaggerFunction]
  #[Doc('A coding agent for developing new features')]
  public function develop(
    #[Doc('Assignment to complete')] string $assignment,
    #[Doc('Source directory to develop')] #[DefaultPath('/')] Directory $source
  ): Directory {
    // Environment with agent inputs and outputs
    $environment = dag()
      ->env()
      ->withStringInput('assignment', $assignment, 'the assignment to complete')
      ->withWorkspaceInput(
        'workspace',
        dag()->workspace($source),
        'the workspace with tools to edit and test code'
      )
      ->withWorkspaceOutput('completed', 'the workspace with the completed assignment');

    // Detailed prompt stored in markdown file
    $promptFile = dag()->currentModule()->source()->file('develop_prompt.md');

    // Put it all together to form the agent
    $work = dag()->llm()->withEnv($environment)->withPromptFile($promptFile);

    // Get the output from the agent
    $completed = $work->env()->output('completed')->asWorkspace();
    $completedDirectory = $completed->getSource()->withoutDirectory('node_modules');

    // Make sure the tests really pass
    $this->test($completedDirectory);

    // Return the Directory with the assignment completed
    return $completedDirectory;
  }
Add the following new function to the main Dagger module in .dagger/src/main/java/io/dagger/modules/hellodagger/HelloDagger.java:
/**
* A coding agent for developing new features
*
* @param assignment Assignment to complete
* @param source The source directory
*/
@Function
public Directory develop(String assignment, @DefaultPath("/") Directory source)
throws ExecutionException, DaggerQueryException, InterruptedException {
// Environment with agent inputs and outputs
Env environment = dag()
    .env()
    .withStringInput("assignment", assignment, "the assignment to complete")
    .withWorkspaceInput(
    "workspace",
    dag().workspace(source),
    "the workspace with tools to edit and test code"
    )
    .withWorkspaceOutput("completed", "the workspace with the completed assignment");

// Detailed prompt stored in markdown file
File promptFile = dag().currentModule().source().file("develop_prompt.md");

// Put it all together to form the agent
LLM work = dag().llm().withEnv(environment).withPromptFile(promptFile);

// Get the output from the agent
Workspace completed = work.env().output("completed").asWorkspace();
Directory completedDirectory = completed.source().withoutDirectory("node_modules");

// Make sure the tests really pass
test(completedDirectory);

// Return the Directory with the assignment completed
return completedDirectory;
}
Be sure to add imports for the following:
import io.dagger.client.Client;
import io.dagger.client.Env;
import io.dagger.client.File;
import io.dagger.client.LLM;
import io.dagger.client.Workspace;
This code creates a Dagger Function called develop that takes an assignment and codebase as input and returns a Directory with the modified codebase containing the completed assignment.
There are a few important points to note here:
- The variable
environmentis the environment to define inputs and outputs for the agent. Each input and output provides a description which acts as a declarative form of prompting. - Other Dagger module dependencies are automatically detected and made available for use in this environment. In this example, Dagger finds the
workspacesub-module installed and automatically generates bindings for it:with-workspace-inputandwith-workspace-output. These bindings can be used to provide (or retrieve) the workspace to the agent. - The LLM is supplied with a prompt file instead of an inline prompt. By separating the prompt from the Dagger Function code, it becomes easier to maintain and update the instructions given to the LLM.
The final step is to add the prompt file. Create a file at .dagger/develop_prompt.md with the following content:
You are a developer on the HelloDagger Vue.js project.
You will be given an assignment and the tools to complete the assignment.
Your assignment is: $assignment

## Constraints
- Before writing code, analyze the Workspace to understand the project.
- Do not make unnecessary changes.
- Always run tests to validate your code changes.
- Do not stop until you have completed the assignment and the tests pass.
This prompt is more structured than the prompt from the first quickstart. The tasks the agent will be asked to complete will be more complex because its making modifications to an existing codebase and will need to understand more context. To create a reliable agent that can operate with more complexity, the prompt structure and tools are extremely important.
To see the new function, run:
dagger functions
Run the agent
Type dagger to launch Dagger Shell in interactive mode.
Check the help text for the new Dagger Function:
.help develop
This should show how to use the develop function.
Make sure your LLM has been properly configured:
llm | model
This should show the model you've configured to use with your provider.
Call the agent with an assignment:
develop "make the main page blue"
If all goes well, the agent will explore the project to find the correct place to make the changes, write the appropriate changes, and then validate them by calling the test function.
If the agent misbehaves, try providing more guidance in the prompt file based on what went wrong.
Since the agent returns a Directory, use Dagger Shell to do more with that Directory. For example:
# Save the directory containing the completed assignment to a variable
completed=$(develop "make the main page blue")
# Get a terminal in the build container with the directory
build-env --source $completed | terminal
# Run the app with the updated source code
build --source $completed | as-service | up --ports 8080:80
# Save the changes to your filesystem
$completed | export .
# Exit
exit
Now you have built an agent that can write code for your project!
Deploy the agent to GitHub
The next step is to take this agent and deploy it so that it can run automatically. For this part of the guide, you will configure GitHub so that when you label a GitHub issue with "develop", the agent will automatically pick up the task and open a pull request with its solution.
The following steps require that you used the GitHub template and have your own hello-dagger repository.
Create the develop-issue function
The develop-issue function will use the github-issue Dagger module from the Daggerverse. This module provides functions to read GitHub issues and create pull requests.
Install the dependency:
dagger install github.com/kpenfound/dag/github-issue@b316e472d3de5bb0e54fe3991be68dc85e33ef38
- Go
- Python
- Typescript
- PHP
- Java
Add the following new function to the main Dagger module in .dagger/main.go:
// Develop with a Github issue as the assignment and open a pull request
func (m *HelloDagger) DevelopIssue(
	ctx context.Context,
	// Github Token with permissions to write issues and contents
	githubToken *dagger.Secret,
	// Github issue number
	issueID int,
	// Github repository url
	repository string,
	// +defaultPath="/"
	source *dagger.Directory,
) (string, error) {
	// Get the Github issue
	issueClient := dag.GithubIssue(dagger.GithubIssueOpts{Token: githubToken})
	issue := issueClient.Read(repository, issueID)

	// Get information from the Github issue
	assignment, err := issue.Body(ctx)
	if err != nil {
		return "", err
	}

	// Solve the issue with the Develop agent
	feature, err := m.Develop(ctx, assignment, source)
	if err != nil {
		return "", err
	}

	// Open a pull request
	title, err := issue.Title(ctx)
	if err != nil {
		return "", err
	}
	url, err := issue.URL(ctx)
	if err != nil {
		return "", err
	}
	body := assignment + "\n\nCloses " + url
	pr := issueClient.CreatePullRequest(repository, title, body, feature)

	return pr.URL(ctx)
}
Add the following new function to the main Dagger module in .dagger/src/hello_dagger/main.py:
@function
async def develop_issue(
    self,
    github_token: Annotated[
        dagger.Secret, Doc("Github Token with permissions to write issues and contents")
    ],
    issue_id: Annotated[int, Doc("Github issue number")],
    repository: Annotated[str, Doc("Github repository url")],
    source: Annotated[dagger.Directory, DefaultPath("/")],
) -> str:
    """Develop with a Github issue as the assignment and open a pull request."""
    # Get the Github issue
    issue_client = dag.github_issue(token=github_token)
    issue = issue_client.read(repository, issue_id)

    # Get information from the Github issue
    assignment = await issue.body()

    # Solve the issue with the Develop agent
    feature = await self.develop(assignment, source)

    # Open a pull request
    title = await issue.title()
    url = await issue.url()
    body = f"{assignment}\n\nCloses {url}"
    pr = issue_client.create_pull_request(repository, title, body, feature)

    return await pr.url()
Add the following new function to the main Dagger module in .dagger/src/index.ts:
/**
   * Develop with a Github issue as the assignment and open a pull request
   * @param githubToken Github Token with permissions to write issues and contents
   * @param issueID Github issue number
   * @param repository Github repository url
   * @param source The source directory
   */
  @func()
  async developIssue(
    githubToken: Secret,
    issueID: number,
    repository: string,
    @argument({ defaultPath: '/' }) source: Directory
  ): Promise<string> {
    // Get the Github issue
    const issueClient = dag.githubIssue({ token: githubToken })
    const issue = issueClient.read(repository, issueID)

    // Get information from the Github issue
    const assignment = await issue.body()

    // Solve the issue with the Develop agent
    const feature = await this.develop(assignment, source)

    // Open a pull request
    const title = await issue.title()
    const url = await issue.url()
    const body = `${assignment}\n\nCloses ${url}`
    const pr = issueClient.createPullRequest(repository, title, body, feature)

    return await pr.url()
  }
Be sure to add Secret to the imports.
Add the following new function to the main Dagger module in .dagger/src/HelloDagger.php:
#[DaggerFunction]
  #[Doc('Develop with a Github issue as the assignment and open a pull request')]
  public function developIssue(
    #[Doc('Github Token with permissions to write issues and contents')] Secret $githubToken,
    #[Doc('Github issue number')] int $issueID,
    #[Doc('Github repository url')] string $repository,
    #[Doc('Source directory to develop')] #[DefaultPath('/')] Directory $source
  ): string {
    // Get the Github issue
    $issueClient = dag()->githubIssue(token: $githubToken);
    $issue = $issueClient->read($repository, $issueID);

    // Get information from the Github issue
    $assignment = $issue->body();

    // Solve the issue with the Develop agent
    $feature = $this->develop($assignment, $source);

    // Open a pull request
    $title = $issue->title();
    $url = $issue->url();
    $body = $assignment . "\n\nCloses " . $url;
    $pr = $issueClient->createPullRequest($repository, $title, $body, $feature);

    return $pr->url();
  }
Be sure to add imports for the following:
use Dagger\Secret;
Add the following new function to the main Dagger module in .dagger/src/main/java/io/dagger/modules/hellodagger/HelloDagger.java:
/**
   * Develop with a Github issue as the assignment and open a pull request
   *
   * @param githubToken Github Token with permissions to write issues and contents
   * @param issueID Github issue number
   * @param repository Github repository url
   * @param source Source directory
   */
  @Function
  public String developIssue(
    Secret githubToken,
    Integer issueID,
    String repository,
    @DefaultPath("/") Directory source
  ) throws ExecutionException, DaggerQueryException, InterruptedException {
    // Get the Github issue
    var args = new Client.GithubIssueArguments().withToken(githubToken);
    GithubIssue issueClient = dag().githubIssue(args);
    var issue = issueClient.read(repository, issueID);

    // Get information from the Github issue
    String assignment = issue.body();

    // Solve the issue with the Develop agent
    Directory feature = develop(assignment, source);

    // Open a pull request
    String title = issue.title();
    String url = issue.url();
    String body = assignment + "\n\nCloses " + url;
    var pr = issueClient.createPullRequest(repository, title, body, feature, "main");

    return pr.url();
  }
Be sure to add imports for the following:
import io.dagger.client.Secret;
import io.dagger.client.GithubIssue;
The develop-issue function connects the dots in the automation flow. It will be called when a GitHub issue is ready to be developed. Using the github-issue dependency, this code will:
- Read the title and body from the GitHub issue
- Use the body as the assignment for the agent
- Open a pull request with the
Directoryreturned by the agent
To see the new function, run:
dagger functions
Create a GitHub Actions workflow
- GitHub Actions will need the ability to call out to an LLM. This means that you must configure GitHub Actions with the same environment variables that you previously configured locally, this time as repository secrets.
To configure new repository secrets:
- From your GitHub repository, select the Settings tab
- Under Security, expand the section "Secrets and Variables" and select Actions
- Select "New repository secret"
- Create a secret for each variable required for your LLM provider. For example:
GEMINI_API_KEY
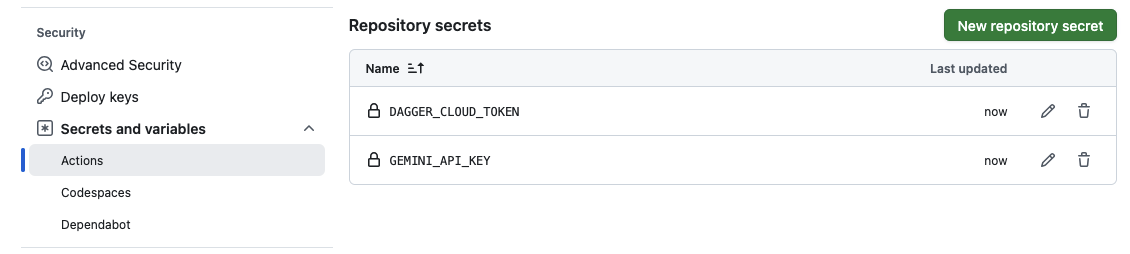
If you signed up for Dagger Cloud, you should also configure a DAGGER_CLOUD_TOKEN repository secret to see your GitHub Actions traces in Dagger Cloud.
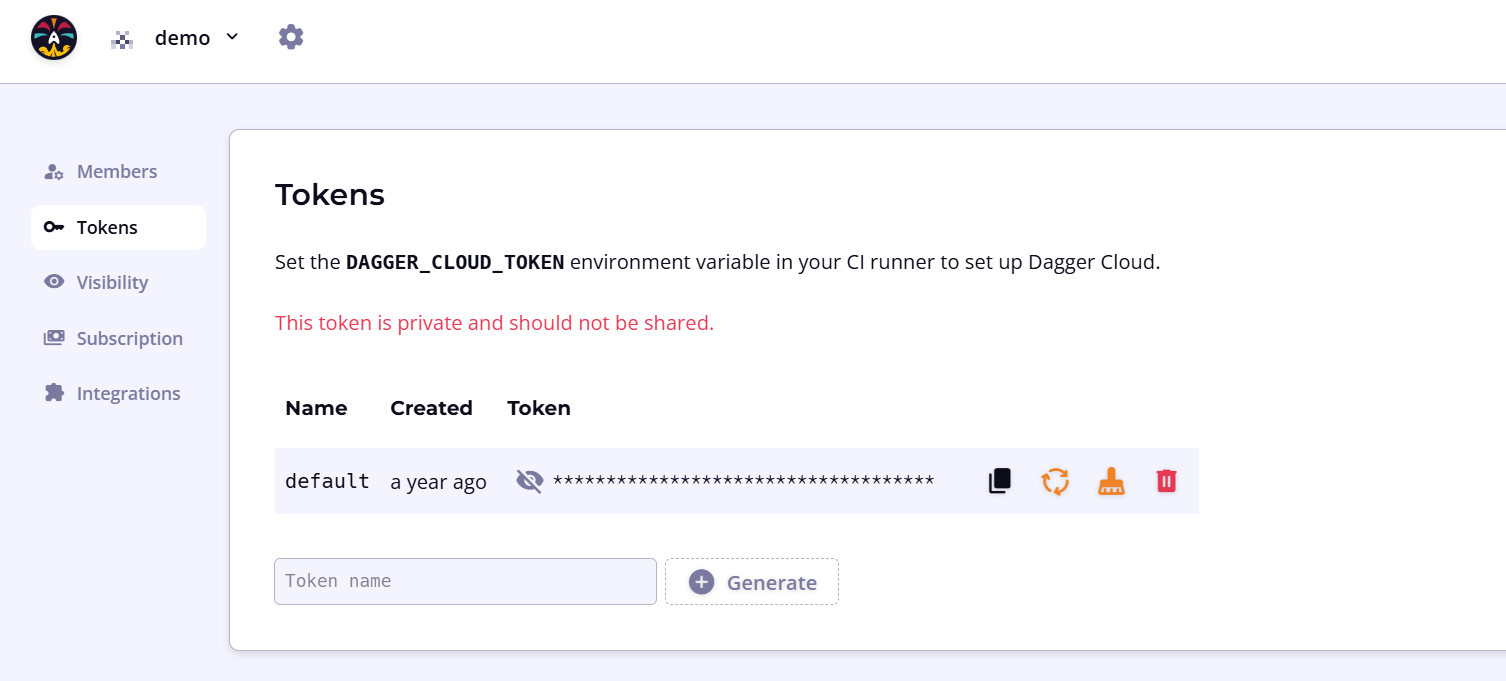
To find your Dagger Cloud token, navigate to the organization settings page using the cogwheel icon in the top navigation bar. Under the Tokens sub-menu, click the eye icon to view the token. You can also use this URL pattern: https://v3.dagger.cloud/{Your Org Name}/settings?tab=Tokens
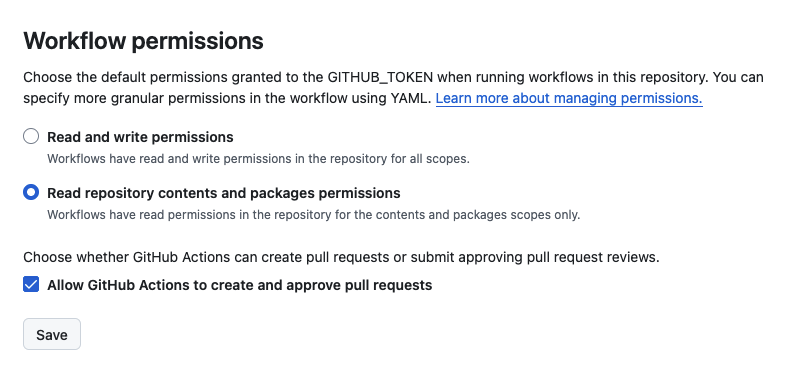
- The repository also needs to be configured to give GitHub Actions the ability to create pull requests. On the left side, select Actions -> General and find the option "Allow GitHub Actions to create and approve pull requests". Make sure this is enabled.
- Create the file
.github/workflows/develop.ymlwith the following content:
name: develop
on:
  issues:
    types:
      - labeled
jobs:
  develop:
    if: github.event.label.name == 'develop'
    name: develop
    runs-on: ubuntu-latest
    permissions:
      contents: write
      issues: read
      pull-requests: write
    steps:
      - uses: actions/checkout@v4
      - uses: dagger/dagger-for-github@v8.3.0
      - name: Develop
        run: |
          dagger call develop-issue \
          --github-token env://GH_TOKEN \
          --issue-id ${{ github.event.issue.number }} \
          --repository https://github.com/${{ github.repository }}
        env:
          DAGGER_CLOUD_TOKEN: ${{ secrets.DAGGER_CLOUD_TOKEN }}
          GEMINI_API_KEY: ${{ secrets.GEMINI_API_KEY }}
          GH_TOKEN: ${{ secrets.GITHUB_TOKEN }}
This snippet shows an example with Google Gemini by specifying GEMINI_API_KEY. Change this to match the repository secrets you created earlier.
This GitHub Actions workflow will call the develop-issue function when the label "develop" is added to an issue. The GitHub token passed to the agent has permissions to read issues, write contents, and write pull requests.
- Commit and push your changes to GitHub:
git add .
git commit -m'deploy agent to github'
git push
Run the agent in GitHub Actions
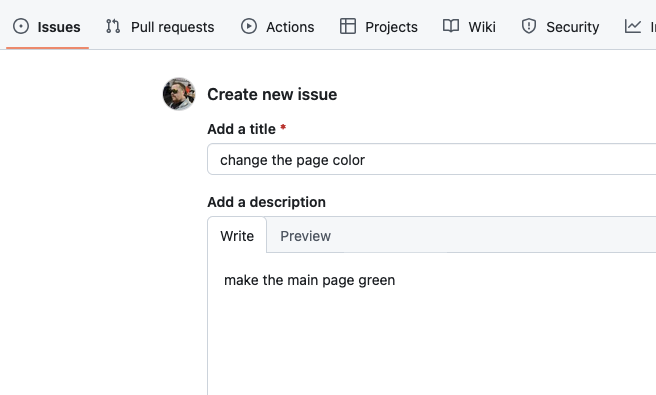
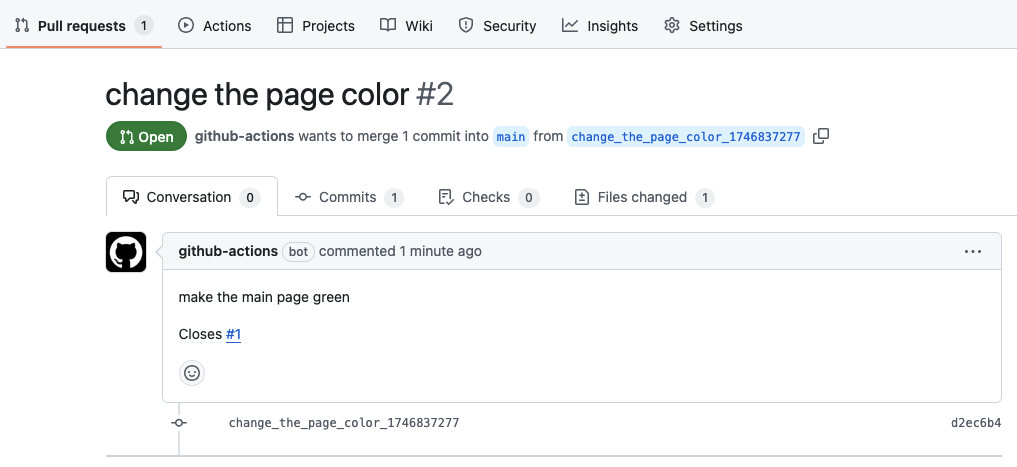
- Create a new GitHub issue in your repository. You can title it "change the page color" with the description "make the main page green".
- Now add the label called "develop" by typing "develop" in the labels input field.

- When the label is added, it triggers the GitHub Actions workflow. See the workflow by clicking the "Actions" tab or by opening Dagger Cloud (if you configured it).
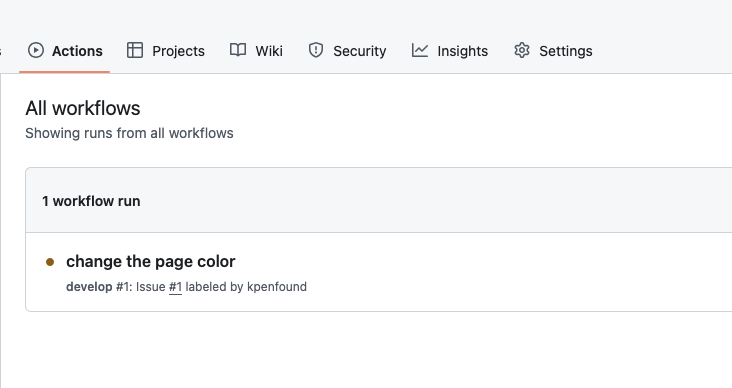
- Once the workflow completes, there will be a new pull request ready to review!
Next steps
Congratulations! You created an agentic function with a Daggerized project and successfully ran it, both locally and in automatically in GitHub.
We encourage you to join our awesome community on Discord to introduce yourself and ask questions. And starring our GitHub repository is always appreciated!