Use Dagger with GitHub Actions and Google Cloud
Introduction
This guide teaches you how to create and use a custom Dagger Module to continuously build and deploy a Node.js application with GitHub Actions on Google Cloud Run. You will learn how to:
- Configure a Google Cloud service account and assign it the correct roles
- Create a Google Cloud Run service accessible at a public URL
- Create a Dagger module for your pipeline
- Run the Dagger pipeline on your local host to manually build and deploy the application on Google Cloud Run
- Use the same Dagger pipeline with GitHub Actions to automatically build and deploy the application on Google Cloud Run on every repository commit
Requirements
This guide assumes that:
- You have a basic understanding of GitHub Actions. If not, learn about GitHub Actions.
- You are familiar with programming in Go, Python or TypeScript.
- You have the Dagger CLI installed in your development environment. If not, install the Dagger CLI.
- You have Docker (or an equivalent container runtime) installed and running on the host system. If not, install Docker.
- You have a Google Cloud account and a Google Cloud project with billing enabled. If not, register for a Google Cloud account, create a Google Cloud project and enable billing.
- You have a GitHub account and a GitHub repository containing a Node.js Web application. This repository should also be cloned locally in your development environment. If not, register for a GitHub account, install the GitHub CLI and follow the steps in Appendix A to create and populate a local and GitHub repository with an example Express application.
Step 1: Create a Google Cloud service account
The Dagger pipeline demonstrated in this tutorial (re)builds a container image of an application every time a new commit is added to the application's repository. It then publishes the container image to Google Artifact Registry and deploys it at a public URL using Google Cloud infrastructure.
This requires the following:
- A Google Cloud service account with all necessary privileges
- A Google Cloud Run service with a public URL and defined resource/capacity/access rules
- A Google Artifact Registry repository
- Access to various Google Cloud APIs
This step discusses how to create a Google Cloud service account. If you already have a Google Cloud service account and key for your project, you may skip this step.
Create a Google Cloud service account, as follows:
-
Log in to the Google Cloud Console and select your project.
-
From the navigation menu, click
IAM & Admin->Service Accounts. -
Click
Create Service Account. -
In the
Service account detailssection, enter a string in theService account IDfield. This string forms the prefix of the unique service account email address.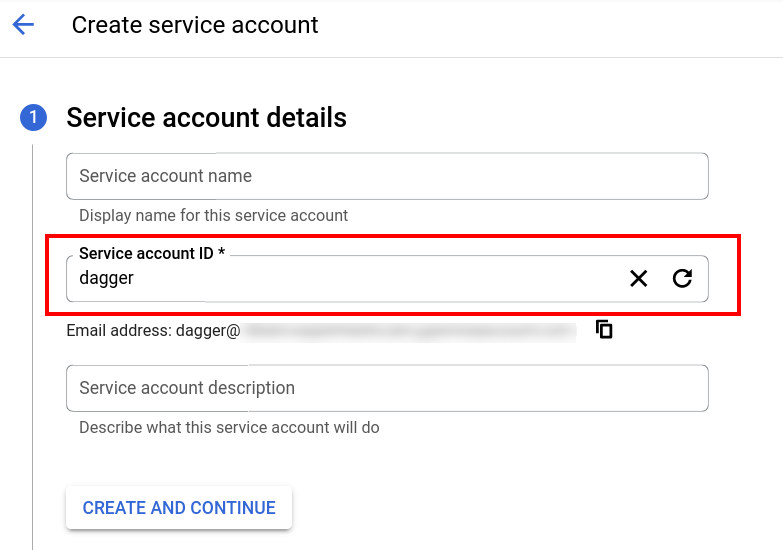
-
Click
Create and Continue. -
In the
Grant this service account access to projectsection, select theService Account Token CreatorandEditorroles.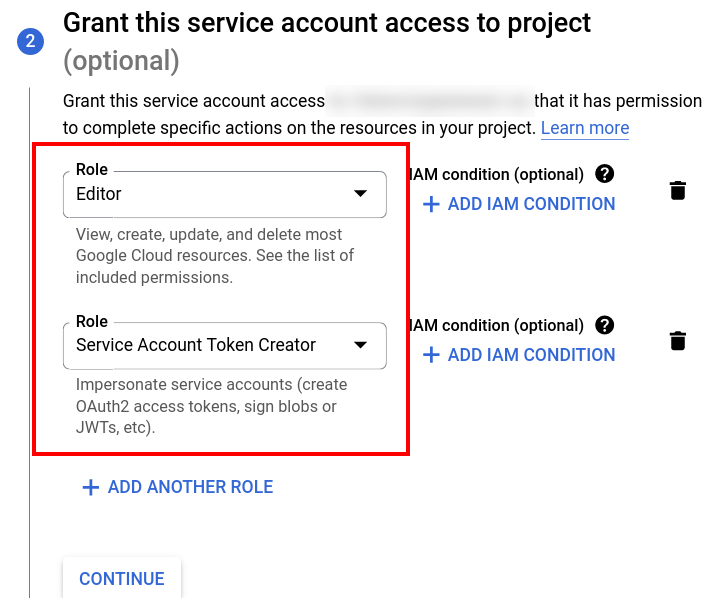
-
Click
Continue. -
Click
Done.
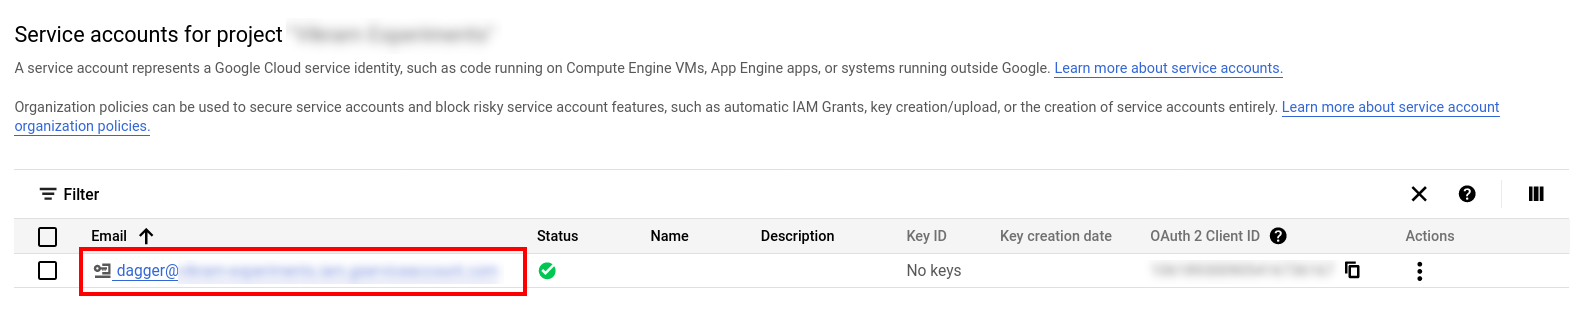
Once the service account is created, the Google Cloud Console displays it in the service account list, as shown below. Note the service account email address, as you will need it in the next step.
Next, create a JSON key for the service account as follows:
- From the navigation menu, click
IAM & Admin->Service Accounts. - Click the newly-created service account in the list of service accounts.
- Click the
Keystab on the service account detail page. - Click
Add Key->Create new key. - Select the
JSONkey type. - Click
Create.
The key file is created and automatically downloaded to your local host through your browser as a JSON file.
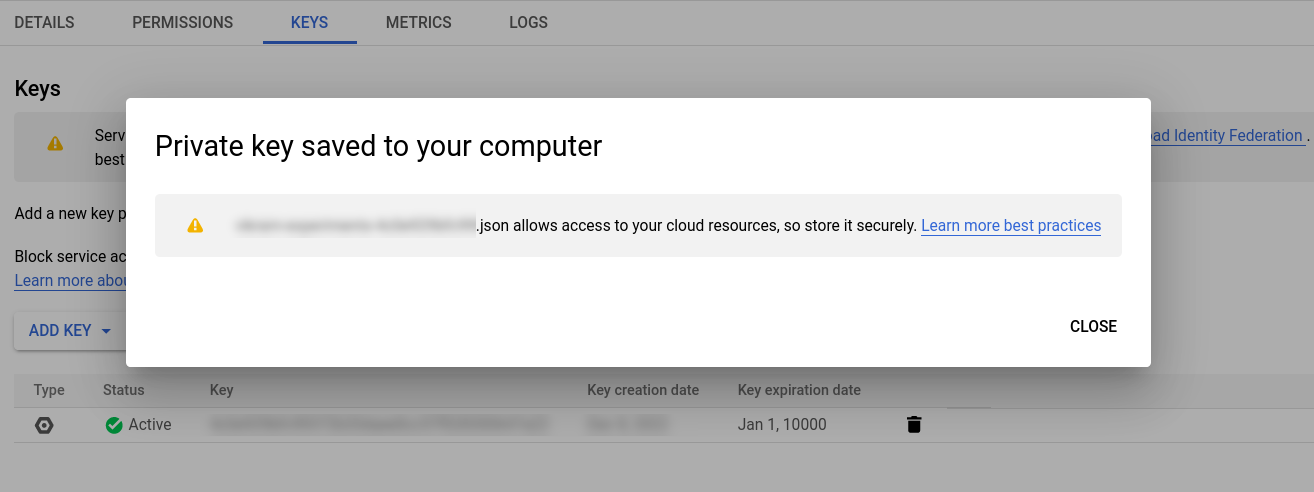
Store the JSON service account key file safely as it cannot be retrieved again.
Step 2: Configure Google Cloud APIs
This step discusses how to enable various Google Cloud APIs. If you already have these APIs enabled, you may skip this step.
The next step is to enable access to the required Google Cloud APIs:
-
From the navigation menu, select the
APIs & Services->Enabled APIs & servicesoption. -
Select the
Enable APIs and Servicesoption. -
On the
API Librarypage, search for and select theCloud Run APIentry. -
On the API detail page, click
Enable.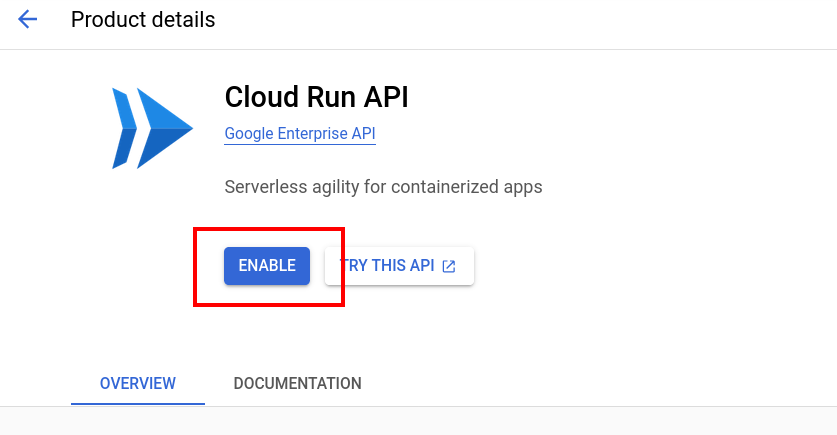
-
Repeat the previous two steps for the
IAM Service Account Credentials APIand theArtifact Registry API.
Once the APIs are enabled, the Google Cloud Console displays the updated status of the APIs.
Step 3: Configure a Google Cloud Run service
This step discusses how to create a Google Cloud Run service. If you already have a Google Cloud Run service for your project, you may skip this step.
The next step is to create a Google Cloud Run service and corresponding public URL endpoint. This service will eventually host the container deployed by the Dagger pipeline.
-
From the navigation menu, select the
Serverless->Cloud Runproduct. -
Select the
Create Serviceoption. -
Select the
Deploy one revision from an existing container imageoption. ClickTest with a sample containerto have a container image URL pre-filled. -
Continue configuring the service with the following inputs, modifying them as needed:
- Authentication:
Allow unauthenticated invocations - CPU allocation and pricing:
CPU is only allocated during request processing - Minimum number of instances:
0 - Maximum number of instances:
1 - Ingress:
Allow all traffic
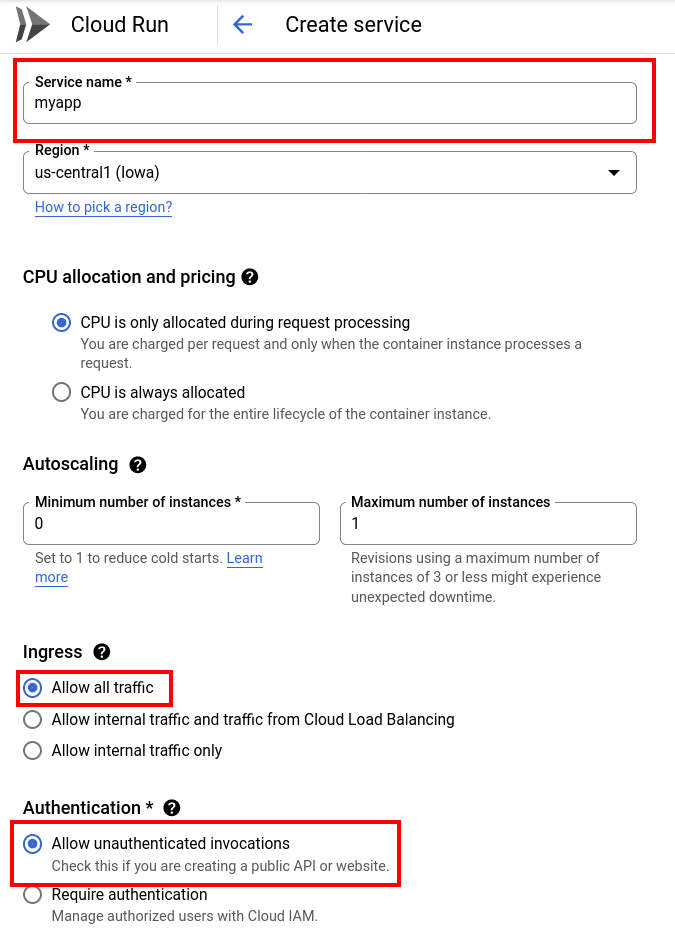
- Authentication:
-
Click
Createto create the service.
The new service is created. The Google Cloud Console displays the service details, including its public URL, on the service detail page, as shown below.
This guide assumes a project named myproject and a service named myapp in the us-central1 region. These details are used as arguments to the Dagger functions in this guide; remember to update them based on the inputs you provided when creating the service.
Step 4: Configure a Google Artifact Registry repository
This step discusses how to create a Google Artifact Registry repository. If you already have a Google Google Artifact Registry repository for your project, you may skip this step.
The next step is to create a repository in Google Artifact Registry. This repository will host the built container image of the application.
-
From the navigation menu, select the
CI/CD->Artifact Registryproduct. -
Select the
Repositoriescategory. -
Select the
Create Repositoryoption. -
Configure the repository with the following inputs, modifying them as needed:
- Format:
Docker - Mode:
Standard - Location type:
Region - Encryption:
Google-managed encryption key - Cleanup policy:
Delete artifacts

- Format:
-
Click
Createto create the repository.
The new repository is created. The Google Cloud Console displays the repository in the repository index page. Click the repository name to view details, including its public URL, as shown below:

This guide assumes a project named myproject and a repository named myrepository in the us-central1` region. These repository details are used as arguments to the Dagger functions in this guide; remember to update them based on the inputs you provided when creating the repository.
Step 5: Create the Dagger Module
The next step is to create a Dagger Module to do the heavy lifting: build a container image of the application, release it to Google Container Registry and deploy it on Google Cloud Run.
- Go
- Python
- TypeScript
-
In the application directory, create a new Dagger Module.
dagger init --name=my-module --sdk=go -
Install the Google Cloud Run module.
dagger install github.com/vvaswani/daggerverse/google-cloud-run -
Update the generated
dagger/main.gofile with the following code.package main
import (
"context"
"fmt"
)
type MyModule struct{}
// build an image
func (m *MyModule) Build(source *Directory) *Container {
return dag.Container().
From("node:21").
WithDirectory("/home/node", source).
WithWorkdir("/home/node").
WithExec([]string{"npm", "install"}).
WithEntrypoint([]string{"npm", "start"})
}
// publish an image
// example: dagger call publish --source . --project PROJECT --location LOCATION --repository REPOSITORY/APPNAME --credential env:GOOGLE_JSON
func (m *MyModule) Publish(ctx context.Context, source *Directory, project string, location string, repository string, credential *Secret) (string, error) {
registry := fmt.Sprintf("%s-docker.pkg.dev/%s/%s", location, project, repository)
return m.Build(source).
WithRegistryAuth(fmt.Sprintf("%s-docker.pkg.dev", location), "_json_key", credential).
Publish(ctx, registry)
}
// deploy an image to Google Cloud Run
// example: dagger call deploy --source . --project PROJECT --registry-location LOCATION --repository REPOSITORY/APPNAME --service-location LOCATION --service SERVICE --credential env:GOOGLE_JSON
func (m *MyModule) Deploy(ctx context.Context, source *Directory, project, registryLocation, repository, serviceLocation, service string, credential *Secret) (string, error) {
// publish image
addr, err := m.Publish(ctx, source, project, registryLocation, repository, credential)
if err != nil {
return "", err
}
// update service with new image
return dag.GoogleCloudRun().UpdateService(ctx, project, serviceLocation, service, addr, 3000, credential)
}This Dagger Module contains three Dagger Functions. Let's look at each in detail.
The
Build()function takes care of building the application image.- It accepts one argument: a
Directoryrepresenting the directory containing the application source code. - It uses the client's
Container().From()method to initialize a new container from a base image. In this example, the base image is thenode:21image. This method returns aContainerrepresenting an OCI-compatible container image. - It uses the
Container.WithDirectory()method to return the container image with the application source code written at the/home/nodepath, and theContainer.WithWorkdir()method to set the working directory in the container. - It chains the
Container.WithExec()method again to install dependencies withnpm installand sets the container entrypoint using theContainer.WithEntrypoint()method.
The
Publish()function takes care of publishing the container image to Google Artifact Registry.- It accepts six arguments: the Go context, a
Directoryrepresenting the directory containing the application source code, and strings representing the Google Cloud project name, Google Artifact Registry location and Google Artifact Registry repository name, and aSecretrepresenting Google Cloud credentials. - It invokes the
Build()function to produce aContainerrepresenting the application image. - It uses the
Container.Publish()method to publish the container to the Google Artifact Registry repository and returns the SHA identifier of the published image.
The
Deploy()function takes care of deploying the application to an existing Google Cloud Run service.- It accepts eight arguments: the Go context, a
Directoryrepresenting the directory containing the application source code, and strings representing the Google Cloud project name, Google Artifact Registry location, Google Artifact Registry repository name, Google Cloud Run service location, Google Cloud Run service name, and aSecretrepresenting Google Cloud credentials. - It invokes the
Publish()function to build and publish aContainerrepresenting the application image. - It uses the Google Cloud Run module to deploy the container image to the named Google Cloud Run service.
- It accepts one argument: a
-
In the application directory, create a new Dagger Module.
dagger init --name=my-module --sdk=python -
Install the Google Cloud Run module.
dagger install github.com/vvaswani/daggerverse/google-cloud-run -
Update the generated
dagger/src/main/__init__.pyfile with the following code.import dagger
from dagger import dag, function, object_type
@object_type
class MyModule:
@function
def build(self, source: dagger.Directory) -> dagger.Container:
"""Build an image"""
return (
dag.container()
.from_("node:21")
.with_directory("/home/node", source)
.with_workdir("/home/node")
.with_exec(["npm", "install"])
.with_entrypoint(["npm", "start"])
)
@function
async def publish(
self,
source: dagger.Directory,
project: str,
location: str,
repository: str,
credential: dagger.Secret,
) -> str:
"""Publish an image"""
registry = f"{location}-docker.pkg.dev/{project}/{repository}"
return await (
self.build(source)
.with_registry_auth(f"{location}-docker.pkg.dev", "_json_key", credential)
.publish(registry)
)
@function
async def deploy(
self,
source: dagger.Directory,
project: str,
registry_location: str,
repository: str,
service_location: str,
service: str,
credential: dagger.Secret,
) -> str:
"""Deploy an image to Google Cloud Run"""
addr = await self.publish(
source, project, registry_location, repository, credential
)
return await dag.google_cloud_run().update_service(
project, service_location, service, addr, 3000, credential
)This Dagger Module contains three Dagger Functions. Let's look at each in detail.
The
build()function takes care of building the application image.- It accepts one argument: a
Directoryrepresenting the directory containing the application source code. - It uses the client's
Container().from_()method to initialize a new container from a base image. In this example, the base image is thenode:21image. This method returns aContainerrepresenting an OCI-compatible container image. - It uses the
Container.with_directory()method to return the container image with the application source code written at the/home/nodepath, and theContainer.with_workdir()method to set the working directory in the container. - It chains the
Container.with_exec()method again to install dependencies withnpm installand sets the container entrypoint using theContainer.with_entrypoint()method.
The
publish()function takes care of publishing the container image to Google Artifact Registry.- It accepts five arguments: a
Directoryrepresenting the directory containing the application source code, and strings representing the Google Cloud project name, Google Artifact Registry location and Google Artifact Registry repository name, and aSecretrepresenting Google Cloud credentials. - It invokes the
build()function to produce aContainerrepresenting the application image. - It uses the
Container.publish()method to publish the container to the Google Artifact Registry repository and returns the SHA identifier of the published image.
The
deploy()function takes care of deploying the application to an existing Google Cloud Run service.- It accepts seven arguments: a
Directoryrepresenting the directory containing the application source code, and strings representing the Google Cloud project name, Google Artifact Registry location, Google Artifact Registry repository name, Google Cloud Run service location, Google Cloud Run service name, and aSecretrepresenting Google Cloud credentials. - It invokes the
publish()function to build and publish aContainerrepresenting the application image. - It uses the Google Cloud Run module to deploy the container image to the named Google Cloud Run service
- It accepts one argument: a
-
In the application directory, create a new Dagger Module.
dagger init --name=my-module --sdk=typescript -
Install the Google Cloud Run module.
dagger install github.com/vvaswani/daggerverse/google-cloud-run -
Update the generated
dagger/src/index.tsfile with the following code.import {
dag,
Container,
Directory,
Secret,
object,
func,
} from "@dagger.io/dagger"
@object()
class MyModule {
/**
* Build an image
*/
@func()
build(source: Directory): Container {
return dag
.container()
.from("node:21")
.withDirectory("/home/node", source)
.withWorkdir("/home/node")
.withExec(["npm", "install"])
.withEntrypoint(["npm", "start"])
}
/**
* Publish an image
*
* example: dagger call publish --source . --project PROJECT
* --location LOCATION --repository REPOSITORY/APPNAME
* --credential env:GOOGLE_JSON
*/
@func()
async publish(
source: Directory,
project: string,
location: string,
repository: string,
credential: Secret,
): Promise<string> {
const registry = `${location}-docker.pkg.dev/${project}/${repository}`
return await this.build(source)
.withRegistryAuth(`${location}-docker.pkg.dev`, "_json_key", credential)
.publish(registry)
}
/**
* Deploy an image to Google Cloud Run
*
* example: dagger call deploy --source . --project PROJECT
* --registry-location LOCATION --repository REPOSITORY/APPNAME
* --service-location LOCATION --service SERVICE
* --credential env:GOOGLE_JSON
*/
@func()
async deploy(
source: Directory,
project: string,
registryLocation: string,
repository: string,
serviceLocation: string,
service: string,
credential: Secret,
): Promise<string> {
const addr = await this.publish(
source,
project,
registryLocation,
repository,
credential,
)
return dag
.googleCloudRun()
.updateService(project, serviceLocation, service, addr, 3000, credential)
}
}This Dagger Module contains three Dagger Functions. Let's look at each in detail.
The
build()function takes care of building the application image.- It accepts one argument: a
Directoryrepresenting the directory containing the application source code. - It uses the client's
Container().from()method to initialize a new container from a base image. In this example, the base image is thenode:21image. This method returns aContainerrepresenting an OCI-compatible container image. - It uses the
Container.withDirectory()method to return the container image with the application source code written at the/home/nodepath, and theContainer.withWorkdir()method to set the working directory in the container. - It chains the
Container.withExec()method again to install dependencies withnpm installand sets the container entrypoint using theContainer.withEntrypoint()method.
The
publish()function takes care of publishing the container image to Google Artifact Registry.- It accepts five arguments: a
Directoryrepresenting the directory containing the application source code, and strings representing the Google Cloud project name, Google Artifact Registry location and Google Artifact Registry repository name, and aSecretrepresenting Google Cloud credentials. - It invokes the
build()function to produce aContainerrepresenting the application image. - It uses the
Container.publish()method to publish the container to the Google Artifact Registry repository and returns the SHA identifier of the published image.
The
deploy()function takes care of deploying the application to an existing Google Cloud Run service.- It accepts seven arguments: a
Directoryrepresenting the directory containing the application source code, and strings representing the Google Cloud project name, Google Artifact Registry location, Google Artifact Registry repository name, Google Cloud Run service location, Google Cloud Run service name, and aSecretrepresenting Google Cloud credentials. - It invokes the
publish()function to build and publish aContainerrepresenting the application image. - It uses the Google Cloud Run module to deploy the container image to the named Google Cloud Run service.
- It accepts one argument: a
Step 6: Test the Dagger pipeline on the local host
Once credentials are configured, test the Dagger Functions by running the command below from the application directory. Remember to update the registry-location, repository, service, and service-location arguments if you specified different values when creating the various Google Cloud services in Step 3 and Step 4, and update the SERVICE-ACCOUNT-KEY-FILE placeholder with the local filesystem path to your JSON service key file from Step 1.
dagger call deploy --source . --project myproject --registry-location us-central1 --repository myregistry/myapp --service-location us-central1 --service myservice --credential file:SERVICE-ACCOUNT-KEY-FILE
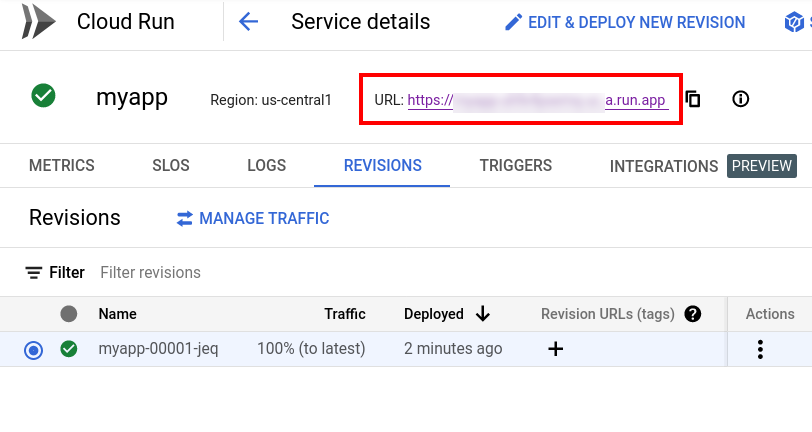
Dagger performs the operations defined in the Dagger Function, logging each operation to the console. At the end of the process, the built container is deployed to Google Cloud Run and the function returns the deployment URL. Browse to the deployment URL to see the running application.
If you deployed the example application from Appendix A, you should see a page similar to that shown below:

Step 7: Create a GitHub Actions workflow
Dagger executes Dagger Functions in standard OCI containers. This means that a Dagger Function will always run the same way, whether on on your local machine or a remote server.
This also means that it's very easy to move the workflow you just encapsulated in Dagger Functions from your local host to GitHub Actions - all that's needed is to define a GitHub Actions workflow to call your Dagger Functions on every commit.
-
Commit and push the Dagger Module to the application's GitHub repository:
git add .
git commit -a -m "Added module"
git push -
In the GitHub repository, create a new workflow file at
.github/workflows/main.ymlwith the following content:name: 'ci'
on:
push:
branches:
- master
jobs:
dagger:
runs-on: ubuntu-latest
steps:
-
name: Checkout
uses: actions/checkout@v4
-
name: Call Dagger Function
uses: dagger/dagger-for-github@v5
with:
version: "0.11.1"
verb: call
args: |
deploy \
--source . \
--project myproject \
--registry-location us-central1 \
--repository myrepository/myapp \
--service-location us-central1 \
--service myservice \
--credential env:GOOGLE_CREDENTIALS \
env:
GOOGLE_CREDENTIALS: ${{ secrets.GOOGLE_CREDENTIALS }}This workflow runs on every commit to the repository
masterbranch. It consists of a single job with two steps, as below:- The first step uses the Checkout action to check out the latest source code from the
mainbranch to the GitHub runner. - The second step uses the Dagger for GitHub action to download and install the Dagger CLI and call the Dagger Function with the required arguments.
- The first step uses the Checkout action to check out the latest source code from the
One of the arguments to the Dagger Function is the Google Cloud JSON service account key, which is retrieved from a GOOGLE_CREDENTIALS environment variable. As shown in the GitHub Actions workflow above, this environment variable is itself populated from a GitHub Actions secret. Create this secret as follows:
- Navigate to the
Settings->Secrets->Actionspage in the GitHub Web interface. - Click
New repository secretto create a new secret. - Configure the secret with the following inputs:
- Name:
GOOGLE_CREDENTIALS - Secret: The contents of the service account JSON key file downloaded in Step 1.
- Name:
- Click
Add secretto save the secret.

Step 8: Test the Dagger pipeline on GitHub
Test the Dagger pipeline by committing a change to the GitHub repository.
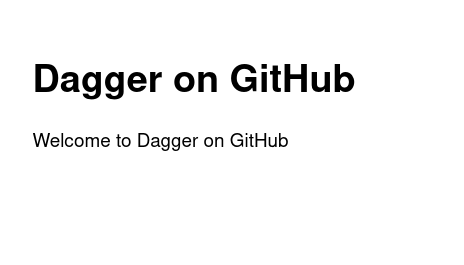
If you are using the example application described in Appendix A, the following commands modify and commit a simple change to the application's index page:
git pull
sed -i 's/Dagger/Dagger on GitHub/g' routes/index.js
git add routes/index.js
git commit -a -m "Update welcome message"
git push
The commit triggers the GitHub Actions workflow defined in Step 7. The workflow runs the various steps of the dagger job, including the pipeline script.
At the end of the process, a new version of the built container image is released to Google Container Registry and deployed on Google Cloud Run. A message containing the deployment URL appears in the GitHub Actions log.
Browse to the URL shown in the deployment message to see the running application. If you deployed the example application with the additional modification above, you see a page similar to that shown below:
Conclusion
This guide walked you through the process of creating a Dagger Module to continuously build and deploy a Node.js application on Google Cloud Run. It explained key concepts, objects and methods available in the Dagger SDKs to create Dagger Functions.
Dagger executes Dagger Functions entirely as standard OCI containers. This means that Dagger Functions can be tested and debugged locally, and that the same Dagger Function will run consistently on your local machine, a CI runner, a dedicated server, or any container hosting service. This portability is one of Dagger's key advantages, and this guide demonstrated it in action by using the same Dagger Functions on the local host and on GitHub.
Appendix A: Create a GitHub repository with an example Express application
This tutorial assumes that you have a GitHub repository with a Node.js Web application. If not, follow the steps below to create a GitHub repository and commit an example Express application to it.
-
Create a directory for the Express application:
mkdir myapp
cd myapp -
Create a skeleton Express application:
npx express-generator -
Make a minor modification to the application's index page:
sed -i -e 's/Express/Dagger/g' routes/index.js -
Initialize a local Git repository for the application:
git init -
Add a
.gitignorefile and commit the application code:echo node_modules >> .gitignore
git add .
git commit -a -m "Initial commit" -
Use the GitHub CLI to create a private repository in your GitHub account and push the changes to it:
gh auth login
gh repo create myapp --push --source . --private